Tables
Tables are great to use if you have content that needs to go into columns e.g. stock sizes and prices. Inserting a table is simple and looks nice and neat once complete.
Inserting a Table ![]()
- Make sure that you are logged in.
- Go to the page that you want to add a table.
- Click on edit.
- Place your cursor in the "Body" of the page where you want your table to appear.
- Click the "Insert/Edit Table" button in the WYSIWYG.
- A new box will open select how many columns and rows you want in your table, along with the width and height and click "Insert".
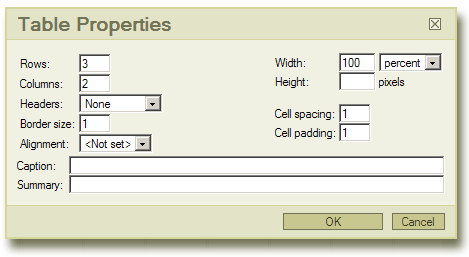
Some of these such as rows and columns are obvious. Others are less so. We would recommend that you change some of the default values in order to get your table better suited to the content.
Headers - The header section will allow you to have preset bold headings which can be defined as either the first row, column or both. While this can also be applied with the bold option on standard text, this may be easier to use if all headings are consistent.
Width - This can either be in pixels (px) or percentage based.
Height - If you want the table to be a fixed height, you can enter this here. Normally it's best to leave this blank and the table's height will then automatically expand to fit the content.
Border Size - If you don't want borders to be visible then change the Border Size to 0. To make thicker borders you can simply increase this number.
Cell Spacing & Cell Padding - Cell Spacing is the spacing between different cells. Cell Padding is the padding between the contents of a cell and the edge of the cell.
Alignment - This is where the table as a whole is positioned on the page. If your table has a 100% width, modifying this setting won't change anything.
- Once your table has been customized to your preference hit OK, and the table will now appear in the Body of the content.
- Click "Save" at bottom of the page.
Inserting text
- Click inside the box you want to put content into.
- You can format the content in the box by using the "WYSIWYG" (as explained earlier in the WYSIWYG Faq).
- You can also delete rows by using the "Delete Rows" button.
- You are also able to "Undo" what you just did.
Changing Properties of Your Table ![]()
These buttons will only be able to be clicked when you are inside a table. They allow you to:
- Change the properties of an individual cell
- Add or delete rows and columns
- Merge rows or columns
- Split rows or columns
Hover over each button to see which action each takes and choose the required button.
View our tutorial on how to "Insert a Table on a Drupal Website".