WYSIWYG
WYSIWYG is an acronym for "What You See Is What You Get" which is the primary editor used for content.
A "WYSIWYG" editor allows you to apply standard features to website content that has been inserted into the "Body" of your web page. It is also the main source for adding an image to a "Page" or any other Content type that has a "WYSIWYG".
In the WYSIWYG you can:
- Bold & Italic
- Change the positioning of text
- Undo and redo
- Create bullet points
- Create links
- Create Anchors
- Insert Images
*Note - for the WYSIWYG to appear in the Body of your page you need to be logged in to your website.*
To Bold and Italic Font 
Before you start writing click on either the B or I in the "WYSIWYG", from here everything you write will be as you selected. If you want to turn this off then unclick either the B or I and continue writing and you will notice that the font will go back to being normal.
To change the alignment of font 
Before you start writing you can decide if you would like the writing to start on either the left, middle or right within the Body. These options are in the "WYSIWYG". You can make different sections go to different sides if you wish, you just select which alignment you would like before writing. If you change your mind once you have written everything then simply highlight what you would like to change and click the alignment you would like.
Undo & Redo 
If you make a mistake and don't want to use the delete or backspace there is the option of an undo button this will undo what you have done since the last time of saving. The redo will go back to what you last did if you click the undo button too many times.
Bullet Points and Numbering 
Bullet points are used for several things eg - lists. Bullet points in the" WYSIWYG" are the same as Word. Simply click the bullet point you want (solid or numbered) and write your content. Once you have written everything you want in bullet form you can either enter and turn the bullet point off or enter down twice and it will automatically turn off. Again if you want to make something into bullet points after writing it simply highlight the wording and click the bullet point you want.
Insert an Image 
To insert an image to your website, it first must be uploaded from your computer to the server. We have written a detailed instruction in other FAQ's, see below for how to insert an image in Drupal.
*Please always remember to regularly save your work*
Here is a step by step guide to download (with screen shots) to help you. Alternatively, you can just read the information below (without screen shots)
Depending on how your website has been configured, there are maybe a couple of ways for you to edit content.
The first is very simple
- Login to your website
- Go to the page you want to edit
- Click the edit button
- Make the changes you require
- Scroll down and click Save
If your webpage doesn't have an edit button
- Login to your website
- Go to your administration section and click on Content Management
- Choose 'content' and view the 'list', this will show every content item that has been created for your website
- If you have a very long list of content you may want to 'filter' to find your item more easily. Click the radio button 'type' and choose from the drop down menu which item you are looking for
- Click 'filter'.
- Once you view the content item you are searching for you can either, click on the name, or click on edit in the right side of the page.
- Make the changes you require
- Scroll down and click Save
- If you go back into the content list - you will need to 'Reset' the filter so that you can see all the changes.
You are likely to encounter this problem when pasting your content / text directly from Word. It happens because when you paste through to the website, Word automatically tries to preserve its own formatting (things such as font styles, sizes, linespacing etc) of your original document. Unfortunately the HTML Word generates behind your text is non web standard and of poor quality. It contains code that will try and override the choices for font, text colour and layout that will build into your website.
If you have copied your content from another location including Microsoft Word or an Email - it will have formatting tags attached to it that you can't see. To remove these tags, YOU MUST paste the content into a plain text formatting file (such as Notepad on Windows or TextEdit on a Mac ), before you paste it onto your webpage.
The WYSIWYG editor will provide a basic ![]() paste as plaint text option to be used but where possible, pasting from notepad/textedit is always ideal.
paste as plaint text option to be used but where possible, pasting from notepad/textedit is always ideal.
If you forget to do this, then copy it again from your web page and paste in notepad and re-paste to your webpage - you may still leave some of the hidden formatting behind.
The way to check if you have done this, is click on the 'Disable rich-text' immediately at the bottom the typing block and see if there is any code left on the page after you've cut and paste it out. Remember to click on 'Enable rich-text' again before you paste or start typing.
If you want to have different types of font on your webpage, you will need to speak with Aspedia to add extra styling to your website. We encourage clients not to do this, as many computers don't have all the fonts that you have, and may view your text very differently to the way you see it.
We choose a font that matches your brand when we first set your website up, and give you different sizes so you can format your text, however, we rarely provide different colours or different fonts for you to choose from to maintain a consistent standard.
Here is a step by step guide to download (with screen shots) to help you. Alternatively, you can just read the information below (without screen shots)
When your website is built, the developer will have created a number of different content types, for example, a standard page, a testimonial, a form, an faq, a gallery item, an event etc. You firstly need to determine what new type of content you wish to create on your website.
- Go to the administration menu and click - create content
- Choose from the list which type of content you want to create
- Complete all the fields
- Scroll down and click Save
If you want to review or edit this page after it's been created, see our section on editing content.
Here is a step by step guide to download (with screen shots) to help you. Alternatively, you can just read the information below (without screen shots)
Images
Images are a great idea to have in a page if you have alot of content as this will break the content up and make it more appealing to read. It is important to consider that image types can severely affect a users loading time and an efficient file type for the particular image should be chosen.
Image Preparation
The WYSIWYG editor can only support the following formats:
- .jpg / .jpeg - If the image has a lot of colour or gradient, but no transparency. The preferred format for uploading photos.
- .png - Preferred format for 8 bit and 16 bit with a lot of colour, gradient and transparency. Complex images may result in a higher file size.
- .gif - Most effective for images that have few colours and little or no gradient e.g. primary colour logos. Ineffective for detailed images colour heavy images such as photographs.
The ideal size of an image is under 100kb, if it's a little bigger it doesn't matter, it just starts slowing the page down. However, try not to go over 500kb. If you have lots of images on one page - it will really slow down the load time, which can be unpleasant for the user and the search engines.
It is preferrable to resize your image to what you expect to appear on your website before you upload it. We recommend your standard computer resizer such as Microsoft Office Picture Manager. Choose the image from your computer, right click and open with "Microsoft Office Picture Manager", from "picture in the menu" choose resize or crop. Then click OK and save.
Inserting an image in the WYSIWYG
- Make sure that you are logged in.
- Go to the page that you want to add an image.
- Click on Edit.
- Place your cursor in the "Body" where you want to insert your image.
- Click on the "Insert/Edit Image" button.
- A new window will open "Image Properties" click on the "Browse Server" in the top right side of the window.
- A new window will open. This is the server location where your uploaded images will be kept. You need to upload the image from your computer to here.
- Click "upload" in the left corner. Then Browse to choose from your computer which image.
- Click "Browse" you can now choose the image that you want to upload.
- Highlight the image and click "open".
- This will return you to "File Browser" window, Click "upload".
- Once uploaded the image will appear in the list of uploaded images.
- The image you have just uploaded should be highlighted in the list. Hit the enter button to confirm your choice of image.
- You will now return to the insert box.
- You should set up the properties of your image at this point. If you forget to do this first time, you can highlight the image click insert button again and repeat this process.
- If the image has already been resized (which is preferable, as per above) leave the width and height. If you need to change the size of the image after it's been uploaded, this is where you can choose the dimensions.
- If you would like a border on your image choose in pixels the width, a good size is 10.
- Horizontal and Vertical space allows the content to wrap around the image, putting a value in these fields is important if you also have text on the page. We recommend 5 or 10 pixels. You will see the white spacing get larger around the image in the text box before you click ok - readjust the pixel sizing if you need to.
- To align where you would like your image to sit in relation to the cursor position, we recommend you choose either left or right of the page.
- Click Ok and the image will appear in the "Body".
- Click "Save" at the bottom of the web page.
- The image will now be inserted on your page where your cursor was.
Before you upload an image you need to ensure that it is in the correct format.
Additional Tricks
When you insert an image you may notice that the image can be a little hard to get in the right spot. You are able to work around this quite easily.
- Getting an image to line up with the top line of text - Click to the right of the top line of text and hit enter. Click on the image and drag it until you see the cursor bar hit the new top line and let go of the mouse.
- Getting an image to move to a certain position - Use your alignment affects to guide your image to your desired location.
- To make your next line of text go directly underneath your previous line of text - Hit shift + enter to avoid creating a new paragraph.
The WYSIWYG editor also provides the ability to resize the image dimensions from within the website. Ideally resizing and cropping should be done before uploading the image online. This is because the website user is still actually downloading the full image; it is just resized within the browser which means the user is downloading a file that is larger than it needs to be. With in most browsers the image will appear to be lower quality when not viewed at 100% of its original size. Conversely if the image is original smaller than the desired resize, some pixilation or image degradation will occur.
Here is a step by step guide to download (with screen shots) to help you. Alternatively, you can just read the information below (without screen shots)
Inserting and Removing Links Guide
Linking to a Webpage
Linking to other webpages is useful for a couple of reasons. The first is that, it helps with search engine optimisation, as search engines understand the text which has a link on it must be important. So it's beneficial to use good keywords in your 'link text'. The second is that it helps with usability for your customers to find their way around your website. If you link related pages then customers will easily be able to find it. The third is that you might want to reference another website, or an authority in your industry to show that you are genuine. However, please note that when you do link to an outside website - there are extra steps so that you don't loose your customer to another site - see below.
To link text to a webpage within your website:
- Make sure that you are logged in.
- First choose the page that you want to link to (not link from). You will need this page number at a later stage - go to the page, hover over the "edit" button - don't click it. When you hover over it, you will see in the bottom left corner of the page, the node number. Write this down. For example, it might be http://websitedomain.com.au/node/29/edit. Write down /node/29 (you just need the node and number)
- Now you should choose where you want to link from. Go to the that page and click edit.
- Highlight the text in the body where you want the link to appear (as mentioned above, use keywords in this text, not just 'click here').
- Click the "insert/edit link"

- Insert in the URL field the destination page number or node number that you previously wrote down - including the / before the node and the / between the node and page number ie /node/29 (you will notice the protocol will automatically change to <other> - this is correct - don't change it back).
- Click Ok.
- This will go back to the "Body" .
- You will now notice that the content you selected to link will be a different colour. The link will not work until you have saved the page.
- Click "Save" at bottom of the page.
To link to a webpage outside of your website:
- Choose the webpage URL that you want to link to for example: http://ato.gov.au/faq. The page can be an article or a blog or any webpage that is online. Write down or copy this URL address.
- Make sure that you are logged in.
- Now you should choose where you want link from. Go to the that page and click edit.
- Highlight the text in the body where you want the link to appear.
- Click the "insert/edit link" button
- Insert in the URL field the destination you wrote down or copied ie http://ato.gov.au/faq
- This time you will have extra steps - click on the "target" tab in the window.
- Select from the drop down menu "new Window (_blank)" if you wish the link to open in a new window
- Click ok.
- This will go back to the "Body" .
- You will now notice that the content you selected to link will be a different colour. The link will not work until you have saved the page.
- Click "Save" at bottom of the page.
If you ever need to remove a link:
- Be in edit mode
- Double click the link
- Click on the "Remove link" button, or change the link address that you have entered.
- Save your page.
Linking to a document, including .PDF, .doc, .xls
To link text to a document hosted on your own site is a two step process. First you will need to upload that document from your computer to the server and then link to it.
- Ensure that you are logged in and go to the page where you want to add the link to the document.
- To add the document to the server, scroll down to the bottom section of the page until you find "File Attachments".
- Click browse, locate the file on your computer, highlight and double click or click open and then "upload". There is a size limit of 10MB.
- The file will now be listed under File Attachments.
- The file will then be given a URL that will be located underneath where you have uploaded the file.
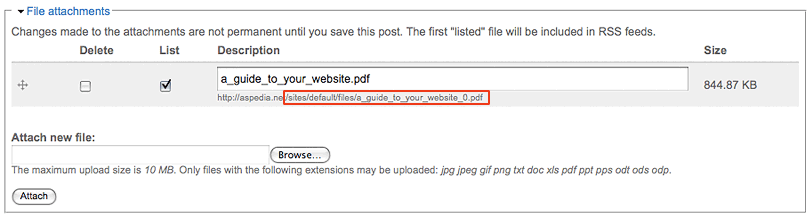
- Highlight the text from after your domain name starting with the first /. (you can highlight by dragging your mouse over the link).
- Copy the text (right click with your mouse and then select "copy")
- Untick the "List" box.
- Scroll back up to the body
- Highlight the text you want to link from.
- Click the "insert/edit link" button
- Paste the URL for the PDF (right click with your mouse inside the box and select "paste"), including the first /. (in this example it would be /sites/default/files/how_to_master_google_win.pdf).
- Click on the "Target" tab and select "New window (_blank) if you wish to tell the link to open in a new window
- Click ok - you won't be able to view the link working until you save the page.
- Save your page.
Please Note: if you want your page to include a list of the files you have uploaded at the bottom of your content on this page - skip step 9. Untick the "list" box.
Anchor Link
An anchor link allows you to jump from one section of text to another on the same web page. You would use anchor links when you wanted to list topics at the top of the page and then have the ability for a customer to click that topic and be taken straight to it without having to read or scroll through the balance of the text.
This is a two-step process. First, you must create an Anchor on the destination before you link your text to it.
1. Creating an Anchor
- Ensure that you are logged in and go to the page where you want to add anchors.
- Be in edit mode.
- Scroll down the page to where you want to add your first destination anchor.
- Place your cursor where you want the customer to land, (no need to highlight text as Anchors are applied to a line, not a word).
- Click the "insert/edit anchor" button

- Give your anchor a name that will make sense when you want to link to it. (Ensure your anchor has no spaces and you separate words by using - or _).
- Click ok.
- Create all your anchors for your page first.
2. Creating a Link to the Anchor
- Scroll back up to the top of your page and highlight the text where you want your first anchor.
- Click the "insert/edit link" button
- Click the "link type" down arrow and select "link to anchor in the text"
- Select the anchor you wish to link your text to
- Click ok
- Once you have linked the text you will see that it is a different colour.
- Click "Save" at bottom of the page.
Please note: It is also good practice to put an anchor at the top of your page called home, you can then add a link at the bottom of your content on text that says "return to the top of page".
Tables
Tables are great to use if you have content that needs to go into columns e.g. stock sizes and prices. Inserting a table is simple and looks nice and neat once complete.
Inserting a Table ![]()
- Make sure that you are logged in.
- Go to the page that you want to add a table.
- Click on edit.
- Place your cursor in the "Body" of the page where you want your table to appear.
- Click the "Insert/Edit Table" button in the WYSIWYG.
- A new box will open select how many columns and rows you want in your table, along with the width and height and click "Insert".
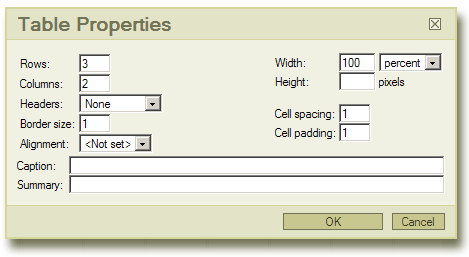
Some of these such as rows and columns are obvious. Others are less so. We would recommend that you change some of the default values in order to get your table better suited to the content.
Headers - The header section will allow you to have preset bold headings which can be defined as either the first row, column or both. While this can also be applied with the bold option on standard text, this may be easier to use if all headings are consistent.
Width - This can either be in pixels (px) or percentage based.
Height - If you want the table to be a fixed height, you can enter this here. Normally it's best to leave this blank and the table's height will then automatically expand to fit the content.
Border Size - If you don't want borders to be visible then change the Border Size to 0. To make thicker borders you can simply increase this number.
Cell Spacing & Cell Padding - Cell Spacing is the spacing between different cells. Cell Padding is the padding between the contents of a cell and the edge of the cell.
Alignment - This is where the table as a whole is positioned on the page. If your table has a 100% width, modifying this setting won't change anything.
- Once your table has been customized to your preference hit OK, and the table will now appear in the Body of the content.
- Click "Save" at bottom of the page.
Inserting text
- Click inside the box you want to put content into.
- You can format the content in the box by using the "WYSIWYG" (as explained earlier in the WYSIWYG Faq).
- You can also delete rows by using the "Delete Rows" button.
- You are also able to "Undo" what you just did.
Changing Properties of Your Table ![]()
These buttons will only be able to be clicked when you are inside a table. They allow you to:
- Change the properties of an individual cell
- Add or delete rows and columns
- Merge rows or columns
- Split rows or columns
Hover over each button to see which action each takes and choose the required button.
View our tutorial on how to "Insert a Table on a Drupal Website".
Page Breaks
Wikipedia's definition of a page break is - page break is a marker in an electronic document, which tells the document interpreter that the contents which follows is part of a new page.
Inserting a Page Break ![]()
You can insert a "Page Break" in a "Page, Blog or News page". This is simply done by using the " Separate the teaser and body of this content" button. Once you have this "Page Break" inserted you can then continue to write your content. Once you have saved the page and you view it, you will see all the content under the "Page Break" is now on a new page.
View our tutorial on "how to create a page break on a drupal website"
About 4 to 6 weeks as long as the designs are approved within 2 days of sending them to the client and the content is ready once the site is built.
When providing images for your website, you may need the picture to be a specific size in order to be uploaded. If the image is too large there are several ways to resize them.
We have found a free online tool that can make this process easy.
Instructions for Single Image Resize
1. Visit www.picresize.com and upload your picture
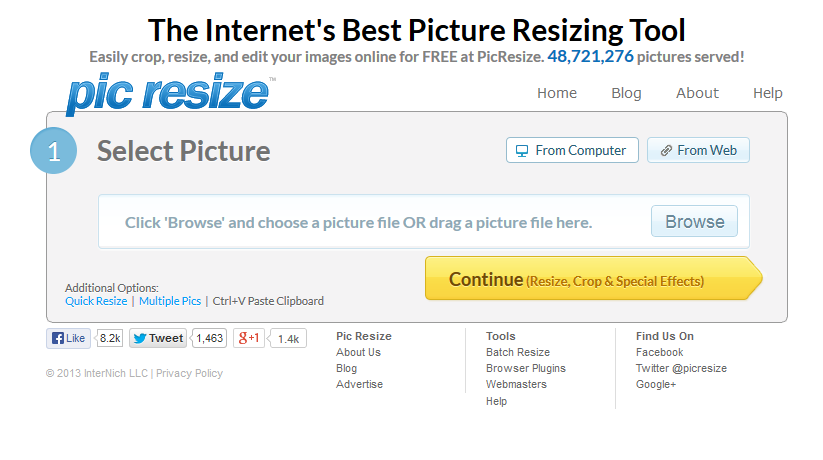
2. Here you can crop and resize the picture by following the instructions.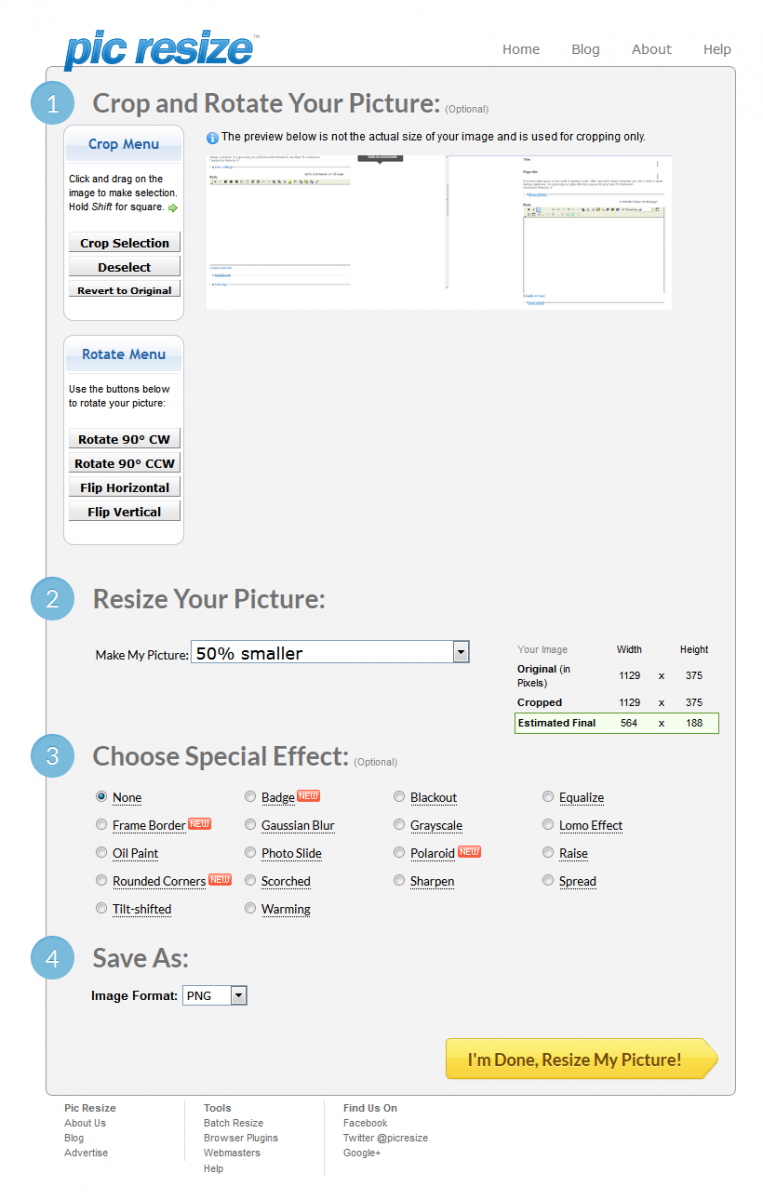
3. Select the image format PNG, JPEG, GIF (if your not sure which format to chose ask your project manager). Click done resize my picture and save the file.
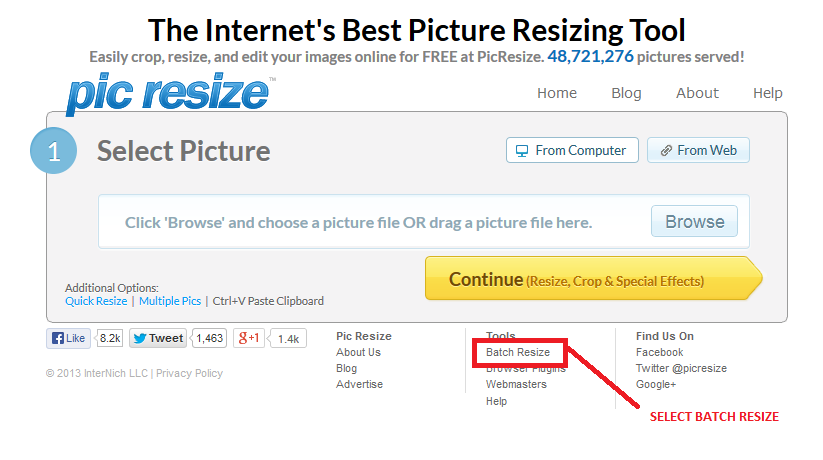
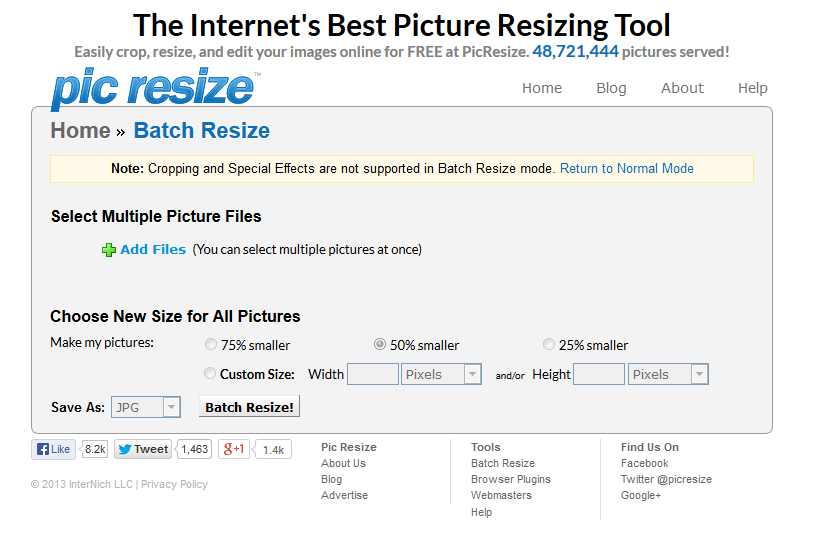
Instructions for Batch Image Resize
1. On the home page select batch resize.
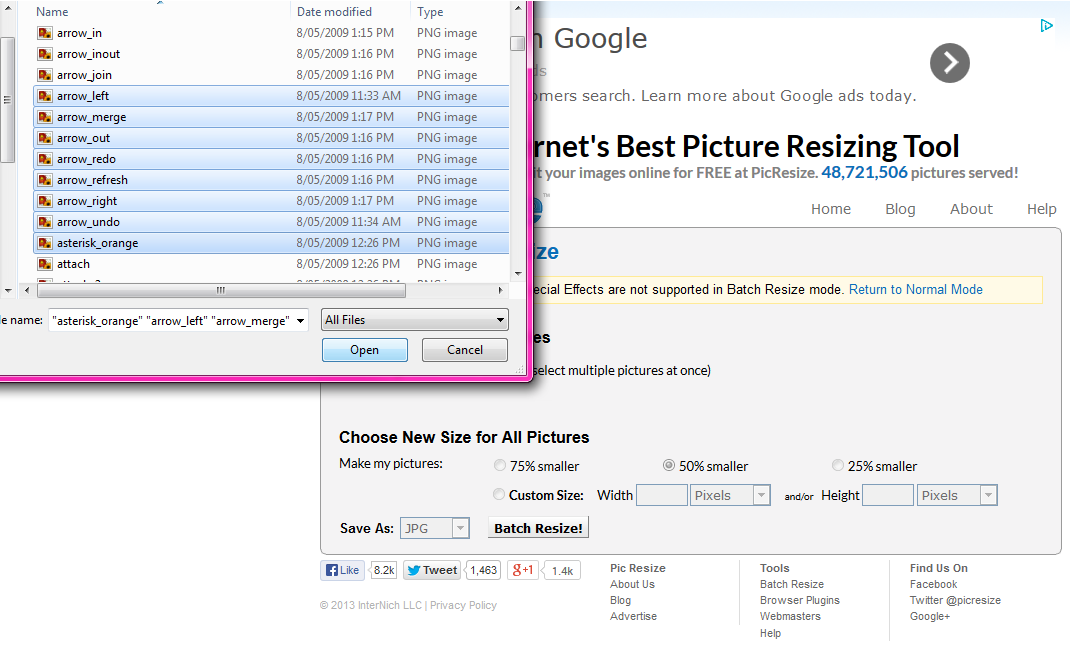
2. Click add files.
3. Select all of the images you wish to upload.
4. Select upload to upload the files.
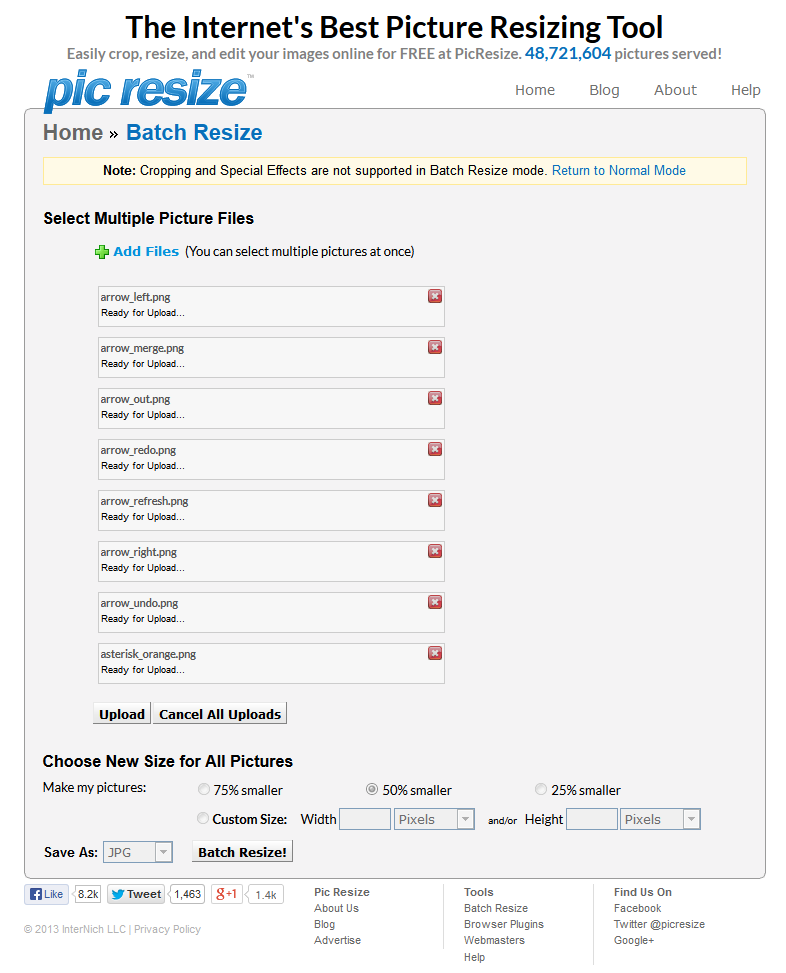
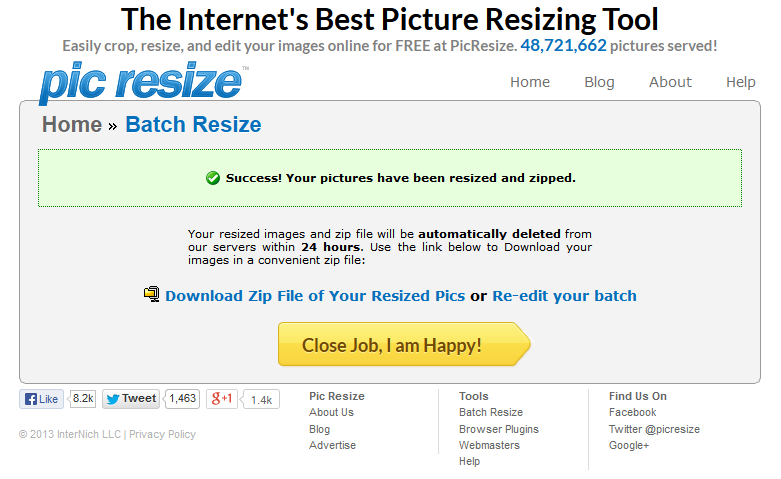
5. Once all of the files are uploaded select the size you wish the images to be and the file type followed by batch resize.
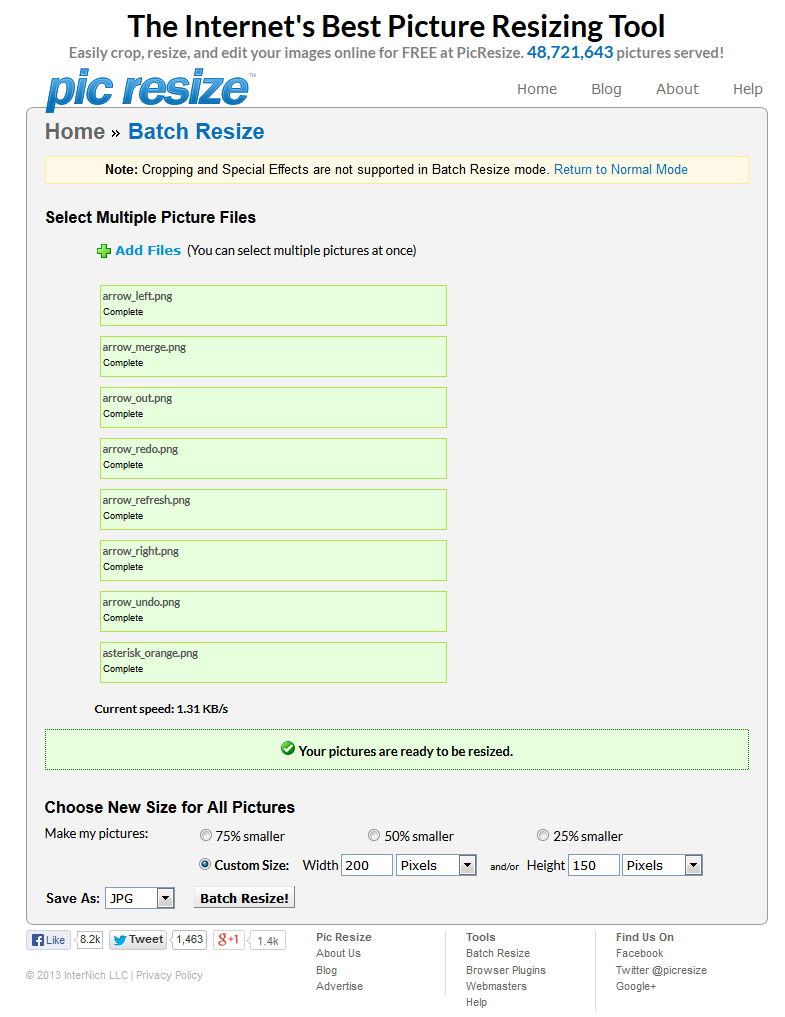
6. When the images have been resized you need to download and save the zip file, once these are saved you can extract all the files from the zip.
Webforms are used to help the customer communicate with your company. Some well known examples include 'Contact Us' forms and 'Feedback' forms. Below are some instructions to help you create and edit your webforms.
Please see the document below for more detailed instructions (with screenshots)
Creating and setting up a new webform
1. Log into your website under the 'webmaster' account.
2. Select 'Create Content' from the black toolbar at the top, followed by 'Webform'.
3. Give your form a title, add a bit of a description, scroll down to the bottom and click 'Save'.
4. After saving, the page will present a 'Webform' section where you create the fields to go on the form. Create the appropriate fields for your form. Note: You will be required to fill in more information with each field you create.
5. Underneath the highlighted tab 'Webform', there is a sub toolbar. Within this toolbar, you can adjust the settings of this form. Such settings include what email address this form is sent to once it has been submitted. By selecting the 'Emails' sub tab, you will be presented with a page that will allow you to enter an email address to send the form to. Once an email has been entered, select 'Add'.
6. You will be taken to a page with more settings, if you wish, you can change them. It is recommended that you leave these settings as the default and scroll down to the bottom and click 'Save E-mail Settings'.
7. Next select the sub tab 'Form Settings'. This will take you to a page that allows you to create a confirmation message that lets your users know the form has been submitted successfully. After typing up a message, scroll down to the bottom and select 'Save Configuration'.
8.Go back to the 'Form Components' sub tab and click 'Save Component'.
You have now set up a new webform
Editing a webform
1. To edit a form, make sure you are logged in.
2. Select 'Content Management'.
3. Scroll down to webforms and search the content until you find the form you wish to edit.
4.View the form.
5. Select the edit tab that appears right above it.
6. If you want to change who is receiving the email - click on email and alter what is already there or create a new email address.
7. If you want to change the screen message that is displayed to the user after pressing the submit button, click on form settings. Either edit what is in the confirmation message or scroll down to see what page (or node number) the user is sent to. Go to that page number and the edit the wording on that page.
8. To view who has completed the form view results, you can view them on screen or download the details
9. Select 'Save'.
This can be done through your website. You must first log in to do so.
1. Log in
2. Click 'E-commerce' tab on the black bar at the top of your screen
3. Hover over 'Transactions' then select 'Transactions List'
The page that loads is a list of all the transactions that have taken place on your website. From here you can edit, delete and update them.
Please see the attached document for further instructions.
There is a list of all your content pages and other content types in your administration menu:
- Login to your website
- In the top menu choose: content management
- Choose content
- Filter to choose type= page (or reset - to see everything)
- If you saved it recently it will be at the top of the list.
- Click on the page title to go to the page or click on the edit button to the right to go straight to edit.
You can choose to put this page into a menu before you save it if you want to access from a menu.
Or you can:
View all unpublished content by:
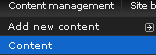
1. Select ‘Content Management’ in the administration bar
![]()
2. Select ‘Content’
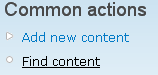
3. On the left hand side in the menu select‘Find Content’
4. Use the filter ‘Status’ and set it to ‘Not published’

This will show ALL unpublished content on your website, including pages. From here you can select ‘Edit’ and then change the content to ‘Published’ or add it to a menu.